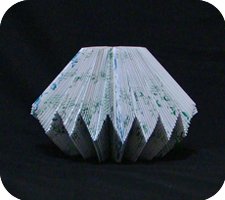
This is a fascinating book sculpture which I call Zigzag for obvious reasons. The model is a little more complicated to fold compared to the other ones presented on this web site. You should already know how to make the Lantern and the Hourglass.
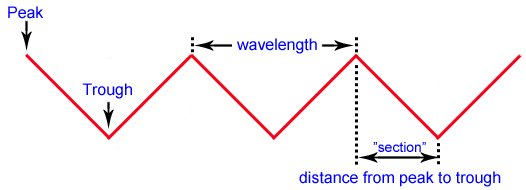
Before we start, we need to borrow a few terms from wave studies.
• the top of the zig zag is a peak;
• the bottom of the zigzag is a trough;
• the distance from peak to peak is a wavelength;
• we are more interested in the distance from peak to trough: I call this a “section”.
Look at your book and determine:
• how many page of paper you have in your book;
• how many peaks and troughs you wish to have in your sculpture; and
• whether you want to start with a peak or a trough.
With this in mind, calculate how many pages of paper will be in each section. For example, let’s assume that your book has 100 pages; if you start at a peak; and you designate 10 pages per section, then you will get about 4 to 5 peaks in your finished book sculpture.

You can add more pages per section to make each section more wide with a less-steep slope. If you have too many pages, you can always remove a few extra pages to get an evenly divisible number of pages. Calculations are not essential, but it is good to think about it before you start folding.
Let’s start zig-zagging!
Instructions for ZigZag Book Sculpture

Step 1:
Take a book and remove the front and back cover but leave the pages bound together. Without ripping off the pages, remove small bits of binding glue that may still be adhering to the spine of the book. Think about how many pages will be in each section (distance between peak and trough). |
|
Step 2:
Fold down the top-corner of the page. At the same time, fold up the bottom-corner of the page. Allow the two edges to meet in the middle. Press down to establish crease. |
|
Step 3:
Notice the pointy part of the paper (green arrow). This is the first peak. Count off the number of pages for one section. In this easy example, count 10 pages so you land on page 11. |
|
Step 4:
On page 11, fold down the top-right corner so the top edge of the page meets the spine of the book. |
|
Step 5:
Fold up the bottom-right corner so it meets the edge made above. |
|
Step 6:
Note the pointy part of the paper (blue arrow). This represents the first trough. |
|
Your goal is to fold the pages between page 1 and page 11 so the pointy part of the paper descends from the green arrow to the blue arrow. You have 9 pages to do this. |
|
Step 7:
Turn back to page 1. Use your fingernail to make a notch that is a little below the pointy part of the paper (red arrow). In this example, notch would be about 1/10 of the way down the section (1mm to 2mm). |
|
Step 8:
Turn the page and fold up the bottom corner so the crease meets the notch you made above. Use the lines and words on the page to help keep the folds nice and straight. |
|
Step 9:
Fold down the top-corner so the sides of the page meet. The top triangle should be a little larger than the bottom triangle. |
|
Step 10:
You can continue folding the subsequent pages the same way: make a notch that is a little below the current pointy part of the page; turn the page and fold based on the notch. |
|
Alternatively, you can accelerate the process by: Either way works but the latter method allows you to see your progress and make changes as necessary. In particular you may need to adjust the location of the notches to make an even descent. |
|
Note the left side of the book with the folded pages descending from peak to trough. Step 11:
It is time to do the next section of the zigzag. Count the pages to page 21. In this next part, page 11 is the trough and page 21 is the peak. |
|
Step 12:
On page 21, fold down the top-corner and fold up the bottom-corner so they meet in the middle. |
|
Step 13:
Turn back to page 11. Your goal is to fold the pages so the pointy part of the paper ascends from the blue arrow to the green arrow. Again, you have 9 pages to do this. |
|
Step 14:
Continue as described above except, make the notch marks a little above the pointy part of the paper. Do this until the entire book has been folded. After a few iterations, you will clearly see the zigzag motif. |


Buy Personalized Book Sculptures


Book sculptures or altered books are often created by modifying the pages of a book while the pages are still bound together. You can cut, fold, paint, and do all sorts of interesting things with the paper to create beautiful structures. The book sculptures on this web site are made by folding only.
