Money Eds Butterfly should really be titled “Ed’s Butterfly”. The addition of “money” helps in its description. Perhaps a a more perfect name would bey “Ed’s Money Origami Butterly”. The model was created by Ed Halley. You can also see his original textual instructions here
Instructions for Money Eds Butterfly

Step 1:
Start with a crisp dollar bill with the black-side facing up.
|

Step 2:
Fold up the left-side of the dollar bill so the bottom-edge of the paper aligns with the middle crease made in step 1. Repeat on the right side except fold the paper down so the top-edge of the paper meets the middle crease.
|

Turn the model over.
|

Step 3:
Fold the top-right corner down. Fold the bottom-left corner up.
|

Step 4:
Valley fold the overhanging strip of paper and tuck it under the main body of the model.
|

Step 5:
Mountain fold (fold back) the right side of the model so it is behind the left side of the model.
|

Rotate quarter turn clockwise. |

Make the thorax (body) of the butterfly: Step 6:
Mountain fold (fold back), the right half behind the left half of the model. Unfold. |

Step 7a:
Make a valley fold that extends from the “head” of the butterfly to the base of the model. The angle of the fold can vary, this will change the size of the thorax. A convenient endpoint is at the quarter mark from the edge of the dollar bill.
|

Step 7b:
Fold the left wing back towards the left. Follow the existing crease made in step 6.
|

Step 7c:
Valley fold the left wing back towards the right. Make the left and right wings symmetrical by joining the wing tips (green dots). |

This is how it looks like. The thorax is complete. The next steps will be for making the upper and lower wings. Open up the model so it resembles a butterfly. |

Make the lower wings: Step 8a:
Mountain fold the right wing behind the left wing. Follow the ridge where the paper overlaps upon itself. |

Step 8b:
Unfold back to basic butterfly shape. |

Step 8c:
Repeat equivalent mountain fold on left side. |

Make upper wings: Step 9:
Mountain fold (fold back) the top of the wings. The crease should go from the “head” of the butterfly to mid-height of the wing. The location of fold can vary to change the size of the upper and lower wings. |

Make lower wings: Step 10:
Valley fold the bottom wings so the upper wings swing up. Make the fold extend from the “head” of the butterfly to mid-length of the lower wing. The location of fold can vary. |

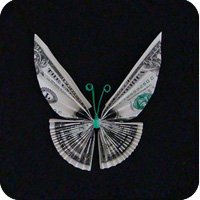
Money Eds Butterfly is done! |

Notice that you can vary the location of the wing and thorax folds. The butterfly on the left was folded at the half-way mark at all steps. The butterfly on the right was folded so the creases are not exactly in the middle. It gives a slightly different look. |
 Butterfly is predominantly green if you start with the black-side if the bill facing up. |
 If you start with the green-side facing up, the butterfly will be black and white with splotchy pattern. Still quite nice.
|