
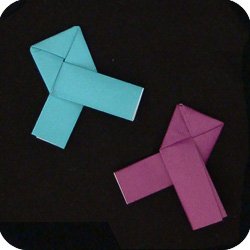
Learn to make this traditional origami design called a Lovers Knot. The fold sequence is surprisingly complex and once made, this model can be the keeper of secrets! The theory goes like this: you write a message on a piece of paper, you fold it into a Lover’s Knot, and then you deliver it. The model is intricately folded such that once opened, it is very difficult (near impossible) to remake the knot. If the recipient finds that the Lover’s Knot has been unknotted, then he/she knows that the message has been read by someone else.
There are two ways to make this origami model. The one shown here is the original method. The second method has a completely different set of folds but the end result is the same.
If these the Lover’s Knot are too difficult for you, you can always try the Love Knot which is much more easier to make.
Instructions for Origami Lovers Knot

Step 1:
Start with a square sheet of paper with the white-side facing up. Fold and unfold in half both directions (left to right; then top to bottom). |

Step 2:
Make a blintz fold: to do this, fold the four corners to the center of the paper.
|

Step 3:
Turn the paper over.
|

Step 4:
Make the blintz fold again (I guess you can call this double blintz).
|

Turn the paper around again.
|

Step 5:
Peel the edge of the paper away from the center of model. This makes the model 3D with a pocket of air under the paper. |

Step 6:
Repeat with the other 3 corners of the paper.
|

Step 7:
Once the model is poofy like a pillow, push in the sides of the model to compress it.
|

It will look like a star. Keep pinching the edges together…
|

…and then flatten the model and place it flat on its side.
|

Step 8:
Peel down the top layer of paper as shown in the next 2 step. |

In transition.
|

Almost done.
|

Step 9:
Peel down the top layer of paper on the the other side.
|

|

|

Step 10:
Turn the model over.
|

Step 11:
Repeat steps 8 & 9 on this side of the model:
|

In progress.
|

…almost done.
|

Step 12:
Valley fold the top-corners down. |

Step 13:
Repeat the valley folds on the back side of the model.
|

Step 14:
Rotate the model so it is standing upright, balanced on its apex and you can look down the center of the model.
|

Step 15:
Slide your thumbs down the center of the model and grasp the two flaps. Slowly pull the flaps apart.
|

In progress. |

Flatten out and rotate. |

Lovers Knot is done.
|
Watch video:
