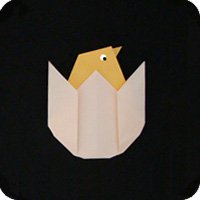
This Chick and Egg origami model is made with two sheets of paper. This is different compared to the Chick N Egg model which is made from a single sheet of paper. Both these models were created by Sarah Wooden and their diagrams were on her web site, Sarah’s Origami. However, that site no longer exist and I have not been able to contact her but hope that she permits me to make photo-instructions of the model.
For the egg, if you want it to be colored, then start with the colored-side of the paper facing up. For the chick, if you want the chick to be colored, then start with the white-side facing up.
Origami Chick and Egg: Instructions for the Egg

Step 1:
Start with a square sheet of paper positioned like a diamond (balanced on one of its corners). Fold the top corner down so the paper is folded in half. |
|
Step 2:
Fold both corners back up. The location of the fold can vary, but approximately 2/3 of the way up would work. |
|
Step 3:
Fold down the topmost layer of paper and…. |
|
fold it up and behind. |
|
Step 4:
Fold the left and right arms of the model up. The location of the fold can vary but try to get the general shape of an egg as shown below. |
|
Unfold. |
|
Step 5:
Re-fold these arms except make it an outside reverse fold. |
|
|
|
|


Instructions for the Chick
Step 6:
Take another sheet of paper and fold it in half (top to bottom). Unfold. |
|
Step 7:
Fold down the top-left edge of the paper so it meets with the horizontal crease made above. |
|
Unfold. |
|
Step 8:
Repeat on the right side of the model. |
|
Step 9:
Make a rabbit ear fold. To do this, bring both the right and left edges towards the middle. This will cause an extra bit of paper to pop out. |
|
Step 10:
Fold this extra bit of paper towards the right. |
|
Step 11:
Fold up the bottom corner so it slides under the rabbit ear made in steps 7 – 10. |
|
Step 12:
Make a mountain fold and fold the model in half (right side goes behind left side). |
|
Step 13:
To shape the neck of the chick, fold the left side of the model towards the right and at an angle. |
|
Step 14:
Repeat behind. |
|
Step 15:
Make two valley fold/unfold as shown. These will be used to make a crimp fold. |
|
|
|
Step 16:
Make a crimp fold. First, fold the tip of the beak back so it is under the head of the chick. |
|
|
|
|
|
|
|
|
|
|