
This Ruff Collar design is so called because it is reminiscent of the ornate collars worn by nobility during the 16th and 17th century.
This design is the hardest one available on this web site yet the instructions are the most abbreviated: you should have already completed two or three of the other designs before trying this one. In particular, you should know how to fold the Zigzag.
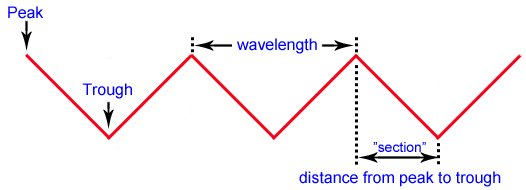
The best way to understand this Ruff Collar motif is to think of it as two zigzags that are completely out of phase. This is to say, the top zigzag is going from peak to trough while the bottom zigzag is going from trough to peak. The two zigzags meet to form diamond shapes.
Zigzags are described with peaks, troughs, and “sections” (distance from peak to trough).
Book Art Instructions for Ruff Collar
In this example, the book has over 200 pages, and each “section” is 10 pages. Because we are making two zigzags, you will need 19 or 20 pages for one “section”. Ten of the pages (odd-numbered pages) will be used to make the lower zigzag, and the other 9 or 10 pages (even-numbered pages) will be used to make the upper zigzag. The two zigzags share the same page at the location where they meet. The diagram below shows the schematics of how the pages will be folded to make the Ruff Collar book sculpture.

You can add more pages per section to make each section more wide with a less steep slope. If you have too many pages, you can always remove a few extra pages to get an evenly divisible number of pages.
|
Step 1:
Take a book and remove the front and back cover but leave the pages bound together. Without ripping off the pages, remove small bits of binding glue that may still be adhering to the spine of the book. |
|
Step 2:
Page 1: Fold down the top-corner of the page so the top edge of the paper touches the spine of the book. Fold up the bottom-corner of the page so the edges meet. This is the same as in the Spinning top. |
|
Step 3:
Turn the page. |
|
Step 4:
Page 2: Fold up the bottom-corner of the page so the edge meets the spine of the book. Fold down the top-corner of the page so the edges meet. |
|
This is how it looks like. |
|
Step 5:
Count off pages until you get to page 21. |
|
Step 6:
Page 21: Fold down the top-corner and fold up the bottom-corner so they meet in the middle. Press down to establish the creases. |
|
This is how it looks like. |


|
Your goal is to fold the pages so the pointy part of the paper converges from the red arrow and the green arrow towards the blue arrow. You have about 10 pages to do this. The odd-numbered pages will be for the lower zigzag and the even-numbered pages will be for the upper zigzag. |


|
Step 7:
Turn back to page 1. Use your fingernail to make a small notch (gray arrow) a few millimeters above the pointy part of page 1. The notch will be on page 3. Similarly, make a small notch on page 4 that is a few millimeters below the pointy part of page 2. These notches will be your landmarks to indicate where to fold. |
|
Step 8:
Turn to page 3. Using the notch as a guide, fold the corners of the page so their edges meet. Use the words or the lines on the page to help you make straight folds. |
|
Step 9:
Turn the page. |
|
Step 10:
Page 4: fold the top and bottom corners so they meet at the location of the notch. In this manner, you will fold the subsequent pages until the pointy part of each page gets closer and closer together. They converge at page 21. |


|
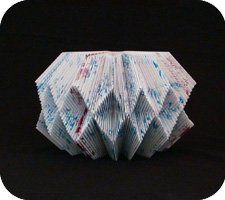
This is how the Ruff Collar looks like after one section is done. |


|
The harlequin or diamond-pattern is evident after a few sections have been completed. |

Shown is a book sculpture made with the hard covers still attached. The bold, red end-sheets completes the stunning display.

Buy Personalized Book Sculptures


Book sculptures or altered books are often created by modifying the pages of a book while the pages are still bound together. You can cut, fold, paint, and do all sorts of interesting things with the paper to create beautiful structures. The book sculptures on this web site are made by folding only.