
Lucky stars are fun to make and fun to give away. You can give them as prizes for work well done, you can give them instead of giving out candy. Young children can learn to count with them and they can try to collect all the possible colors.
These origami stars are made with one long strip of paper; it does not require glue or tape; and best of all, they are not flat, they are “puffy”.
Instructions for Lucky Stars

Step 1:
Start with a strip of paper that is of ratio 1:13. For example, if your paper is 1″ wide, it should be 13″ long. If you use a standard USA 8.5″ x 11″ sheet of paper, you can cut off a 1/2″ slice and that works nicely. You can also buy pre-cut papers here. |

Step 2:
Make a loop along one end of the paper strip. |

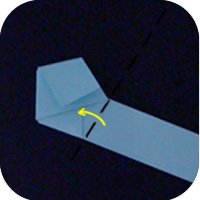
Step 3:
Weave the short end of the paper strip through the loop as if you were making an overhand knot. |

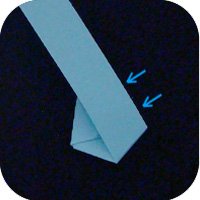
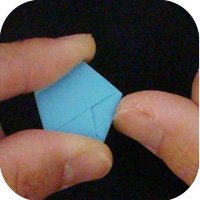
Step 4:
Pull and tug on the long end of the paper strip to tighten the loop. When the knot is snug, press down to flatten. The key to making beautiful lucky stars is to have the edges of the paper come together nicely to form a distinct pentagon (blue arrow mark the corners of the pentagon.)
|

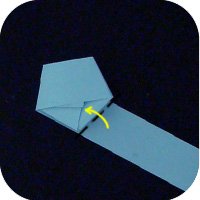
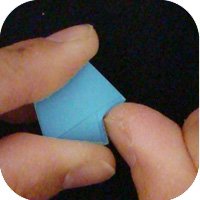
Step 5:
Valley fold the short end of the paper strip so it lies on top of the pentagon. If this stub of paper is too long, you may need to cut it a little so it doesn’t extend past the pentagon shape.
|
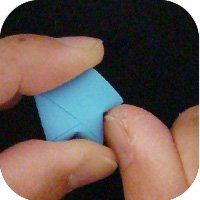
Step :6
Valley fold the long end of the paper strip so it lies on top of the pentagon.
|
 This is how it looks like. Make sure that the edge of the paper strip (blue arrow) aligns with the edge of the pentagon. The layers of paper should be flush. |

Step 7:
Turn the paper over so the long end of the paper strip is pointing down. Valley fold the long end of the paper strip so it lies on top of the pentagon.
|
 Again, be sure that the edges are flush with one another (blue arrows). Turn the paper over so the tail of the paper strip points down again. |
Step 8:
Repeat: valley fold the strip of paper on top of the pentagon. Make sure you line-up the layers of paper so you keep the pentagon shape. Turn the paper over. |
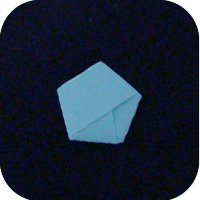
 Repeat wrapping the paper around the pentagon shape until there is no more paper left. |

Step 9:
At the end you will have a stub of paper that is too short to wrap around. Tuck this end piece under an existing layer of paper. |
 If the stub of paper is too long, trim it a little. Or, if it is too short, unwrap it once to have enough length to tuck it securely. |
Step 10:
Hold the pentagon shape along the edges. Hold firmly but do not squish the face of the pentagon. |
 Use your fingernail to push-in one of the sides of the pentagon. |
 This will cause a dent in the pentagon. Rotate the shape and repeat with the other sides of the pentagon.
|
  This is how it looks like when all 5 sides have been pushed-in. |
 If your Lucky Stars are not puffing up, then you are probably holding the pentagon the wrong way. The correct way is to hold the paper along the edges. Do not hold the pentagon so your thumb is on the face of the shape. If you did that, the star won’t puff up because your thumb is pressing on it. |

- buy paper for making lucky stars
- make a Lucky Heart
- more origami stars
- Home Page
- Site Map
Watch video: